


We all know the usual Time Intelligence function based on years, quarters, months, and days. But sometimes, we need to perform more exotic timer intelligence calculations. But we should not forget to consider performance while programming the measures.

Introduction
There are many Dax functions in Power BI for Time Intelligence Measures.
The most common are:
You can find a comprehensive list of Time Intelligence functions here: Time Intelligence – DAX Guide. These functions cover the most common cases.
However, some requirements cannot be easily covered with these functions. And here we are.
I want to cover some of these cases I encountered in my projects, which include:
- Last n Periods and some variants
- How to cope with Leap years
- Week-to-Date calculations
- Calculating Weekly sums
- Fiscal Week YTD
I will show you how to use an extended date table to support these scenarios and improve efficiency and performance.
Most Time-Intelligence functions work regardless of whether the Fiscal Year is aligned with the calendar year. One exception is Year-to-Date (YTD).
For such cases, look at the DATESYTD() function mentioned above. There, you will find the optional parameter to pass the last day of the Fiscal year.
The last case will cover calculations based on weeks, while the Fiscal year doesn’t align with the calendar year.
Scenario
I will use the well-known ContosoRetailDW data model.
The Base Measure is Sum Online Sales, which has the following code:
Sum Online Sales = SUMX('Online Sales',
 ( 'Online Sales'[UnitPrice]
            * 'Online Sales'[SalesQuantity] )
                         - 'Online Sales'[DiscountAmount] )
I will work almost exclusively in DAX-Studio, which provides the Server Timing function to analyze the performance of the DAX code. In the References section below, you can find a link to an article about how to collect and interpret performance data in DAX Studio.
This is the base query used in my examples to get some data from the data model:
EVALUATE
 CALCULATETABLE(
 SUMMARIZECOLUMNS('Date'[Year]
 ,'Date'[Month Short Name]
,'Date'[Week]
,'Date'[Date]
,"Online Sales", [Sum Online Sales]
)
 ,'Product'[ProductCategoryName] = "Computers" ,'Product'[ProductSubcategoryName] = "Laptops"
,'Customer'[Continent] = "North America"
 ,'Customer'[Country] = "United States"  ,'Customer'[State/Province] = "Texas" )
In most examples, I will remove some filters to get more complete data (for each day).
Date table
My date table includes a relatively large number of additional columns.
In the references section below, you can find some articles written by SQLBI, on building weekly related calculations, including creating a date table to support these calculations.
As described in my article about date tables referenced below, I have added the following columns:
- Index or Offset columns to count the days, weeks, months, quarters, semesters, and years from the current date.
- Flag columns to mark the current day, week, month, quarter, semester, and year based on the current date.
- This and the previous columns require a daily recalculation to ensure the correct date is used as the reference date.
- Start- and End-Dates of each week and month (Add more if needed).
- Start- and End-Dates for the Fiscal Year.
- Previous year dates to include the start and end dates of the current period. This is especially interesting for weeks, as the start- and end dates of the weeks are not the same from year to year.
As you will see, I will use these columns extensively to simplify my calculations.
In addition, we will use the Calendar Hierarchy to calculate the needed results at different levels of the hierarchy.
A complete Calendar hierarchy contains either:
- Year
- Semester
- Quarter
- Month
- Day
Or
- Year
- Week
- Day
If the Fiscal Year doesn’t align with the Calendar year, I built the Hierarchy with the Fiscal Year instead of the Calendar Year.
Then, I added a separate FiscalMonthName column and a FiscalMonthSort column to ensure that the first month of the fiscal year was shown first.
OK, let’s start with the first case.
Last n periods
This scenario calculates the rolling sum of values over the past n periods.
For example, for each day, we want to get the Sales for the last 10 days:

Here is the Measure I came up with:
Online Sales (Last 10 days) =
 CALCULATE (
 [Sum Online Sales]
 ,DATESINPERIOD (
 'Date'[Date],
MAX ( 'Date'[Date] ),
-10,
DAY
 )
 )
When executing the query filtering for Computers and North America, I get this result:

If I look at the server timings, the result is not bad:
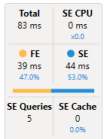
As you can see, the Storage engine performs more than half of the work, which is a good sign. It’s not perfect, but as the execution time is less than 100 ms, it’s still very good from the performance point of view.
This approach has one crucial issue:
When calculating the rolling sum over multiple months, you must know that this approach is date oriented.
This means that when you look at a specific time, it goes back to the same day of the given month. For example:
We look at January 12. 2024, and we want to calculate the rolling sum over the last three months. The starting date for this calculation will be November 13. 2023.
When do we want to get the rolling sum for the entire month?
In the case above, I want to have as the starting date November 1, 2023.
For this case, we can use the MonthIndex column.
Each column has a unique index based on the current date.
Therefore, we can use it to go back three months and get the entire month.
This is the DAX Code for this:
Online Sales rolling full 3 months =
VAR CurDate =
MAX ( 'Date'[Date] )
VAR CurMonthIndex =
MAX ( 'Date'[MonthIndex] )
VAR FirstDatePrevMonth =
CALCULATE (
MIN ( 'Date'[Date] ),
REMOVEFILTERS ( 'Date' ),
'Date'[MonthIndex] = CurMonthIndex - 2
)
RETURN
CALCULATE (
[Sum Online Sales],
DATESBETWEEN (
'Date'[Date],
FirstDatePrevMonth,
CurDate
)
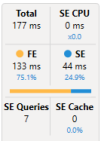
)The execution is still quick, but it’s less efficient, as most of the calculations cannot be performed by the Storage engine:
I tried other approaches (for example, 'Date'[MonthIndex] >= CurMonthIndex – 2 && 'Date'[MonthIndex] <= CurMonthIndex), but these approaches were worse than this one.
Here is the result for the same logic, but for the last two months (To avoid showing too many rows):

Regarding Leap Years
The leap year problem is odd, which is evident when calculating the previous year for each day. Let me explain:
When I execute the following Query to get the last days of February for the years 2020 and 2021:
EVALUATE
CALCULATETABLE (
 SUMMARIZECOLUMNS (
 'Date'[Year],
 'Date'[Month Short Name],
 'Date'[MonthKey],
 'Date'[Day Of Month],
 "Online Sales", [Sum Online Sales],
 "Online Sales (PY)", [Online Sales (PY)]
 ),
 'Date'[Year] IN {2020, 2021},
 'Date'[Month] = 2,
 'Date'[Day Of Month] IN {27, 28, 29},
 'Customer'[Continent] = "North America",
 'Customer'[Country] = "United States"
)
 ORDER BY 'Date'[MonthKey],
 'Date'[Day Of Month]
I get the following result:

As you can see above, the result for February 28. 2020 is shown twice, and one day is missing the February 2021 for Online Sales (PY).
When looking at the month, the sum is correct:

The problem is that there is no February 29 in 2021. Therefore, there is no way that the sales for February 29, 2020 will be displayed when listing the Sales Amount per day.
While the result is correct, it will be wrong when the data is exported to Excel, and the values are summed. Then, the sum of the daily results will differ from those shown for the entire month.
This can undermine the users’ perceived reliability of the data.
My solution was to add a LeapYearDate table. This table is a copy of the Date table but without a Date column. I added one row each year on February 29, even for non-leap years.
Then, I added a calculated column for each month and day (MonthDay):
MonthDay = ('LeapYearDate'[Month] * 100 ) + 'LeapYearDate'[Day Of Month]The Measure to calculate the previous year manually and using the new table is the following:
Online Sales (PY Leap Year) =
 VAR ActYear =
 SELECTEDVALUE ( 'LeapYearDate'[Year] )
 VAR ActDays =
 VALUES ( 'LeapYearDate'[MonthDay] )
 RETURN
 CALCULATE (
 [Sum Online Sales],
 REMOVEFILTERS ( LeapYearDate ),
 'LeapYearDate'[Year] = ActYear - 1,
 ActDays
 )
As you can see, I got the current year, and by using the VALUES() function, I got the list of all dates in the current filter context.
Using this method, my Measure works for single Days, Months, Quarters, and Years. The result of this Measure is the following:

As you can see here, the Measure is very efficient, as most of the work is done by the Storage engine:

But, to be honest, I don’t like this approach, even though it works very well.
The reason is that the LeapYearDate table does not have a date column. Therefore, it cannot be used as a Date table for the existing Time Intelligence functions.
We must also use the calendar columns from this table in the visualizations. We cannot use the ordinary date table.
Consequently, we must reinvent all Time Intelligence functions to use this table.
I strongly recommend using this approach only when necessary.
Week to Date and PY
Some Business areas concentrate on Weekly analysis.
Unfortunately, the standard Time Intelligence functions do not support weekly analysis out of the box. Therefore, we must build our Weekly Measures by ourselves.
The first Measure is WTD.
The first approach is the following:
Online Sales WTD v1 =
 VAR MaxDate = MAX('Date'[Date])

 VAR CurWeekday = WEEKDAY(MaxDate, 2)

 RETURN
 CALCULATE([Sum Online Sales]
 ,DATESBETWEEN('Date'[Date]
 ,MaxDate - CurWeekDay + 1  ,MaxDate)
 )
As you can see, I use the WEEKDAY() function to calculate the start date of the week. Then, I use the DATESBETWEEN() function to calculate the WTD.
When you adapt this pattern to your situation, you must ensure that the second parameter in WEEKDAY() is set to the correct value. Please read the documentation to learn more about it.
The result is the following:

Another approach is to store the first date of each week in the Date table and use this information in the Measure:
Online Sales WTD PY v2 =
 VAR DayOfWeek = MAX('Date'[Day Of Week])

 VAR FirstDayOfWeek = MIN('Date'[FirstDayOfWeekDatePY])
 RETURN
 CALCULATE([Sum Online Sales]
 ,DATESBETWEEN('Date'[Date]
 ,FirstDayOfWeek
,FirstDayOfWeek + DayOfWeek - 1)
 )
The result is precisely the same.
When analyzing the performance in DAX Studio, I see that both Measures are comparable to each other:
I tend to use the second one, as it has better potential when combined with other Measures. But in the end, it depends on the current scenario.
Another challenge is to calculate the previous year.
Look at the following dates for the same week in different weeks:
As you can see, the dates are shifted. And as the standard time intelligence functions are based on shifting dates, they will not work.
I tried different approaches, but in the end, I stored the first date of the same week for the previous year in the date table and used it like in the second version of WTD shown above:
Online Sales WTD PY =
 VAR DayOfWeek = MAX('Date'[Day Of Week])

 VAR FirstDayOfWeek = MIN('Date'[FirstDayOfWeekDatePY])
 RETURN
 CALCULATE([Sum Online Sales]
 ,DATESBETWEEN('Date'[Date]
 ,FirstDayOfWeek
,FirstDayOfWeek + DayOfWeek - 1)
 )
This is the result:

As the logic is the same as in the WTD v2, the performance is also the same. Therefore, this Measure is very efficient.
Weekly Sums for PY
Sometimes, the weekly view is enough, and we don’t need to calculate the WTD at the Daily level.
We don’t need a WTD Measure for this scenario for the current year. The base Measure sliced by Week can cover this. The result is correct out of the box.
But, again, it’s another story for PY.
This is the first version I came up with:
Online Sales (PY Weekly) v1] =
 VAR ActYear = MAX('Date'[Year])

 RETURN
 CALCULATE([Sum Online Sales]
 ,ALLEXCEPT('Date'
 ,'Date'[Week]
)
 ,'Date'[Year] = ActYear - 1
 )
Here, I subtract one from the current year while retaining the filter for the current week. This is the result:
The performance is good, but I can do better.
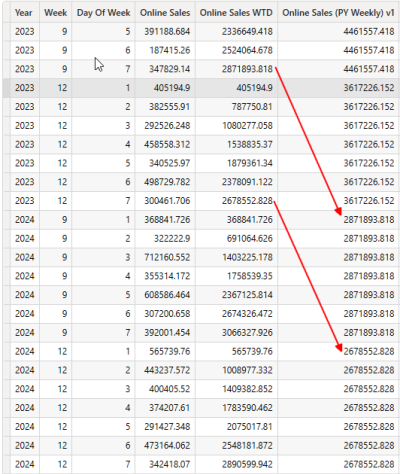
What if I could store a unique Week Identifier in the Date column?
For example, the Current Week is 9 of 2025..
The Identifier would be 202509.
When I detract 100 from it, I get 202409, the identifier for the same week in the previous year. After adding this column to the date table, I can change the Measure to this:
MEASURE 'All Measures'[Online Sales (PY Weekly) v2] =
VAR WeeksPY = VALUES('Date'[WeekKeyPY])
RETURN
CALCULATE([Sum Online Sales]
,REMOVEFILTERS('Date')
,'Date'[WeekKey] IN WeeksPY
)
This version is much simpler than before, and the result is still the same.
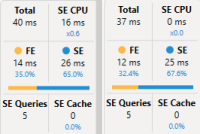
When we compare the execution statistics of the two versions, we see this:
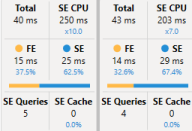
As you can see, the second version, with the precalculated column in the Date table, is slightly more efficient. I have only four SE queries, a good sign for increased efficiency.
Fiscal Weeks YTD
This last one is tricky.
The requirement is that the user wants to see a YTD starting from the first day of the first week of the Fiscal year.
For example, the Fiscal year starts on July 1.
In 2022, the week containing July the 1st starts on Monday, June 27.
This means that the YTD calculation must start on this date.
The same applies to the YTD PY calculation starting Monday, June 28, 2021.
This approach has some consequences when visualizing the data.
Again, knowing if the result must be shown at the day or week level is essential. When showing the data at the day level, the result can be confusing when selecting a Fiscal Year:

As you can see, Friday is the first day of the Fiscal year. And the YTD result doesn’t start on July 1st but on Monday of that week.
The consequence is that the YTD doesn’t seem to start correctly. The users must know what they are looking at.
The same is valid for the YTD PY results.
To facilitate the calculations, I added more columns to the Date table:
- FiscalYearWeekYear—This field contains the numerical representation of the Fiscal year (for 23/24, I get 2324), starting with the first week of the Fiscal year.
- FiscalYearWeekYearPY – The same as before, but for the previous year (FiscalYearWeekYear – 101).
- FiscalWeekSort—This sorting column starts the week with the first day of the fiscal year. A more elaborate way to use this column could be to follow the ISO-Week definition, which I didn’t do to keep it more uncomplicated.
- FiscalYearWeekSort – The same as before but with the FiscalYearWeekYear in front (e. g. 232402).
- FirstDayOfWeekDate – The date of the Monday of the week in which the current date is in.
Here is the Measure for the Daily YTD:
Online Sales (Fiscal Week YTD) =
VAR FiscalYearWeekYear = MAX('Date'[FiscalYearWeekYear])
VAR StartFiscalYear = CALCULATE(MIN('Date'[Date])
,REMOVEFILTERS('Date')
,'Date'[FiscalYearWeekSort] =

FiscalYearWeekYear * 100 + 1

)

VAR FiscalYearStartWeekDate = CALCULATE(MIN('Date'[FirstDayOfWeekDate])
,ALLEXCEPT('Date'
,'Date'[FiscalYearWeekYear]
)
,'Date'[Date] = StartFiscalYear

)
VAR MaxDate = MAX('Date'[Date])
RETURN
CALCULATE([Sum Online Sales]
,REMOVEFILTERS('Date')

,DATESBETWEEN('Date'[Date]
,FiscalYearStartWeekDate

,MaxDate
)
Here is the DAX Code for the Daily YTD PY:
Online Sales (Fiscal Week YTD) (PY)] =
VAR FiscalYearWeekYear = MAX('Date'[FiscalYearWeekYear])
-- Get the Week/Weekday at the start of the current Fiscal Year
VAR FiscalYearStart = CALCULATE(MIN('Date'[Date])
,REMOVEFILTERS('Date')
,'Date'[FiscalYearWeekSort] =

FiscalYearWeekYear * 100 + 1
)
VAR MaxDate = MAX('Date'[Date])
-- Get the number of Days since the start of the FiscalYear
VAR DaysFromFiscalYearStart =
DATEDIFF( FiscalYearStart, MaxDate, DAY )
-- Get the PY Date of the Fiscal Year Week Start date
VAR DateWeekStartPY = CALCULATE(MIN('Date'[Date])
,REMOVEFILTERS('Date')
,'Date'[FiscalYearWeekSort] =

(FiscalYearWeekYear - 101) * 100 + 1
)
RETURN
CALCULATE(
[Sum Online Sales],
DATESBETWEEN(
'Date'[Date],
DateWeekStartPY,
DateWeekStartPY + DaysFromFiscalYearStart

)
)
As you can see, both Measures follow the same pattern:
- Get the current Fiscal Year.
- Get the Starting Date of the current Fiscal Year.
- Get the Starting date of the week starting the Fiscal Year.
- Calculate the Result based on the Difference between these two dates
For the PY Measure, one additional step is required:
- Calculate the days between the starting and current dates to calculate the correct YTD. This is necessary because of the date shift between the years.
And here is the DAX code for the weekly base YTD:
Online Sales (Fiscal Week YTD) =
VAR FiscalWeekSort = MAX( 'Date'[FiscalWeekSort] )
-- Get the Week/Weekday at the start of the current Fiscal Year
VAR FiscalYearNumber = MAX( 'Date'[FiscalYearWeekYear] )

RETURN
CALCULATE(
[Sum Online Sales],
REMOVEFILTERS('Date'),
'Date'[FiscalYearWeekSort] >= (FiscalYearNumber * 100 ) + 1
&& 'Date'[FiscalYearWeekSort] <= (FiscalYearNumber * 100 ) +
FiscalWeekSort
)
For the weekly YTD PY, the DAX code is the following:
Online Sales (Fiscal Week YTD) (PY) =
VAR FiscalWeekSort = MAX( 'Date'[FiscalWeekSort] )
-- Get the Week/Weekday at the start of the current Fiscal Year
VAR FiscalYearNumberPY = MAX( 'Date'[FiscalYearWeekYearPY] )
RETURN
CALCULATE(
[Sum Online Sales],
REMOVEFILTERS('Date'),
'Date'[FiscalYearWeekSort] >= (FiscalYearNumberPY * 100) + 1
&& 'Date'[FiscalYearWeekSort] <= (FiscalYearNumberPY * 100) +
FiscalWeekSort
)
Again, both Measures follow the same pattern:
- Get the current (Sort-) number of the week in the Fiscal year.
- Get the start date for the fiscal year’s first week.
- Calculate the result based on these values.
The result for the weekly based Measure is the following (At the weekly level, as the value is the same for each day of the same week):

When comparing the two Approaches, the Measure for the weekly calculation is more efficient than the one for the daily calculation:

As you can see, the Measure for the weekly result is faster, has a more significant portion executed in the Storage Engine (SE), and has fewer SE queries.
Therefore, it can be a good idea to ask the users if they need a WTD result at the day level or if it’s enough to see the results at the week level.
Conclusion
When you start writing Time Intelligence expressions, consider whether additional calculated columns in your date table can be helpful.
A carefully crafted and extended date table can be helpful for two reasons:
- Make Measures easier to write
- Improve the performance of the Measures
They will be easier to write as I do not need to perform the calculations to get the intermediary results to calculate the required results.
The consequence of shorter and simpler Measures is better efficiency and performance.
I will add more and more columns to the template of my date table as I encounter more situations in which they can be helpful.
One question remains: How to build it?
In my case, I used an Azure SQL database to create the table used in my examples.
But it’s possible to create a date table as a DAX table or use Python or JavaScript in Fabric or whatever data platform you use.
Another option is to use the Bravo tool from SQLBI, which allows you to create a DAX table containing additional columns to support exotic Time Intelligence scenarios.
References
You can find more information about my date-table here.
Read this piece to learn how to extract performance data in DAX-Studio and how to interpret it.
An SQLBI article about building a date table to support weekly calculations: Using weekly calendars in Power Bi – SQLBI
SQLBI Pattern to perform further weekly calculations:
Week-related calculations – DAX Patterns
Like in my previous articles, I use the Contoso sample dataset. You can download the ContosoRetailDW Dataset for free from Microsoft here.
The Contoso Data can be freely used under the MIT License, as described here.
I changed the dataset to shift the data to contemporary dates.
Source link
#Advanced #Time #Intelligence #DAX #Performance #Mind


: Bose, Shokz, JLab")


